
Building a Gundam diorama is something I’ve always wanted to do. The problem was I never really found a subject that inspired me to actually do the work. It’s one thing to look at a mobile suit’s design and think “I need to build that”.
But to marry that with an idea for a setting, that is a different matter.
It wasn’t something I actively pursued by any means. While I knew I wanted to do a diorama project, I was content to “wait for it”. I knew that when the right subject presented itself, the idea would flow.
Building A Gundam Diorama – The Idea Finally Hit Me
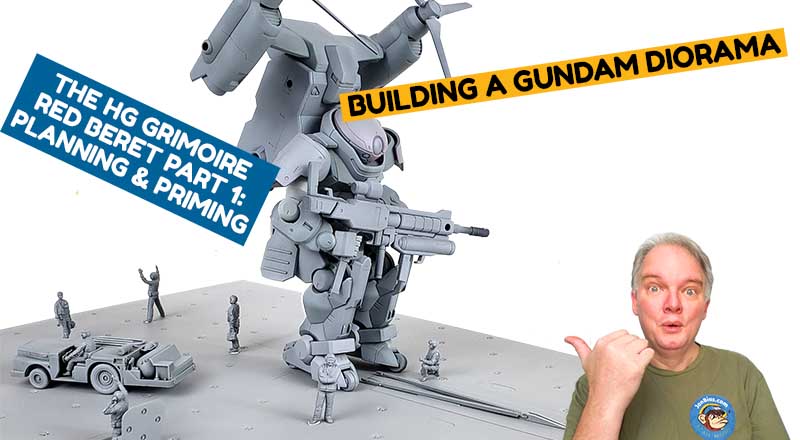
I’d seen several modelers build Bandai’s HG Grimoire Red Beret, which appeared in the Mobile Suit Gundam: Build Divers anime series. I’d watched that series, though the design didn’t really grab me initially.
However, when I saw that a tilt-rotor add-on pack was available, the diorama idea just flowed from it immediately.
With the tilt-rotor pack added on, the Grimoire looked a bit like a V-22 Osprey. My imagination went to work, developing a full near-future scenario as my guide.
I envisioned it being a recon/strike vehicle that could be launched from aircraft and assault carriers. Following in the Osprey’s footsteps, it would be a US Marine Corps vehicle. I also imagined that the tilt-rotor pack would detach once the mobile suit was deployed for its recon or strike mission. It could then loiter in the area, providing surveillance, air support, or even unload troops that could be carried in its lower section.
The soldier in me was quite happy with the tactical possibilities. 🙂
The final piece of the puzzle was the scale. While the Grimoire’s scale was 1/144, the available accessories to put it in the setting I wanted was mostly 1/72. I realized that simply placing it with figures of that scale would essentially “re-scale it”… and thus solve the problem.
This video covers the planning and priming stage.
Leave a Reply