
Being one of the taller kids in my freshman class, I was approached by the basketball coach in the first few days of my high school journey. The assumption, I suppose, was “Hey – he’s tall. He must play basketball.” And though that assumption was correct, the coach would soon find out something I already knew all too well.
I was absolutely awful at shooting the basketball.
In fact, that awfulness extended into a few other areas, such as passing, catching, receiving, running, jumping, and generally being aware of my surroundings. Though he did not know all this at the time, he would soon find out.
About the third day of practice, as it become plainly evident that I was awful, he took me aside to work on the fundamentals. Puzzling to my 14-year-old mind was being shown into a room with a film projector. He said “just watch this”. Turning on the projector, he left the room.
The movie was essentially a “How To Shoot The Basketball” type of thing, with none other than Coach John Wooden showing how to do it. He described in great detail the proper shooting motion. His process broke it down into every single step, every motion, no matter how small. The film then went on to describe ways of practicing each portion of the motion, in order to get all the mechanics right.
By the end, I was greatly encouraged. As the movie clacked along on the old projector, I’d mimicked the moves he was demonstrating. Grabbing a basketball sitting in the room, I eventually began to take shots against the wall. About the time the film finished, the coach returned. Taking me out to the court, he then patiently worked with me for quite a while, having me repeat the basic motions over and over. And over. And over.
When I went home that evening, I went out in my driveway, and continued the work, long after the sun had set.
And This Affects Modeling How?
The key to being confident in your model finishing skills is repetition.
I normally don’t like to make blanket statements, but I think in this area I am safe. While all of us come into the hobby with vastly different degrees and ranges of inborn skill, all of us can benefit from practice. I know this because at heart I am an inept modeler. Just as in my basketball days, I often watch newer modelers flourish and grow in a very short time. Yet everything I do seems to come slowly, through great difficulty. And as with my hoop journey, my modeling journey is often maddening. It seems to be a never-ending pursuit to get things to look as I see them in my head, yet so often, after taking my shot, I watch as the ball clangs off the rim.
Close… but not quite.
Yet I also have some perspective that comes from age. Perfection isn’t the goal. Enjoyment of the hobby is.
So what I have tried to do is base everything I do on some simple, reasonable, and most importantly easily replicated techniques. While I may vary the details, the basic mechanics – just like shooting a basketball, don’t change.
This does two principal things for me.
First, it speeds things up. Any point of a build that I can just sort of turn on the autopilot means things get one faster. And for better or worse – my real hobby is not building scale models, but rather writing about building scale models, I have to build quickly to have things to write about. (In truth, if I am remembered for anything, I hope it would be my writing, not my models so much.)
Second, it removes obstacles along the way at major points in a model build. Regardless of the genre you’re working in, there are milestones that are reached. For example, in an aircraft, typical points along the build of note are cockpit completion, airframe assembly, basic painting, decals, and final finish. Interspersed in between there can be dozens of additional details, layers, and methods. Yet, if those key points are developed as strong points of skill, then all the other steps can be focused on, and those basics are made easy.
One of the areas that I have become comfortable with replicating in a fairly quick fashion, almost on autopilot, is applying the basic paint to a model in what I call “distressed” fashion.
Now, the “distress” is not on me, it’s on the model. I use the term distress simply to imply that the paint has seen some fading, weathering, and abuse over time. While later layers will further enhance this,, this foundation is key, I believe, to “selling” the later steps.
And I certainly did not invent this! Just as in my basketball days, I watched others who have actual skill in the hobby, and I do my level best to try to replicate their work. While many have inspired me, I can point out two modelers who have greatly influenced me in this area – Greg Cooper and Daniel Zamarbide. Years ago, Greg had posted a very thorough explanation of his build of a Japanese twin-engined aircraft, and his method for distressing paint really had an impact on me. Years later, when I acquired Daniel’s Aircraft Scale Modeling FAQ, all the elements I had been working on really fell into place.
Of course, I am not comparing myself to those fellows. They are light years beyond my work. They are the Bob Ross to my TV viewer. I watch them, and try to emulate their work, but I will always be learning. Yet those modelers, and so many others, give me something to strive for.
And You’ll Get To the Point When?
Right now… sorry.. getting to the point. 🙂

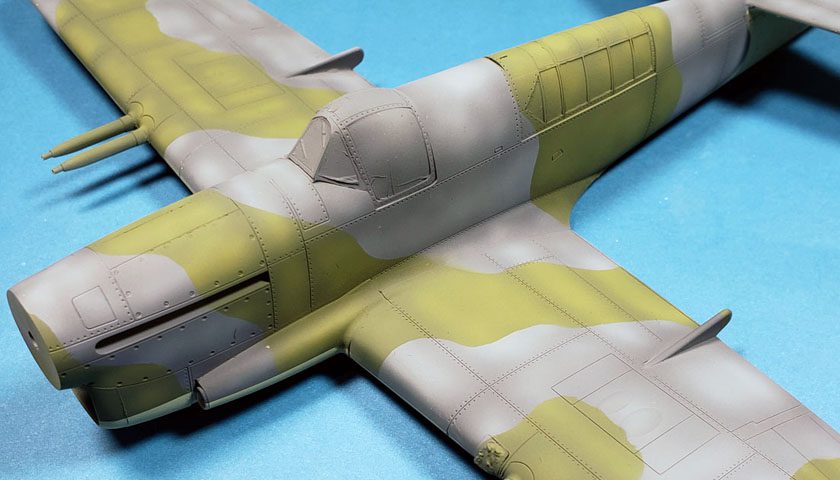
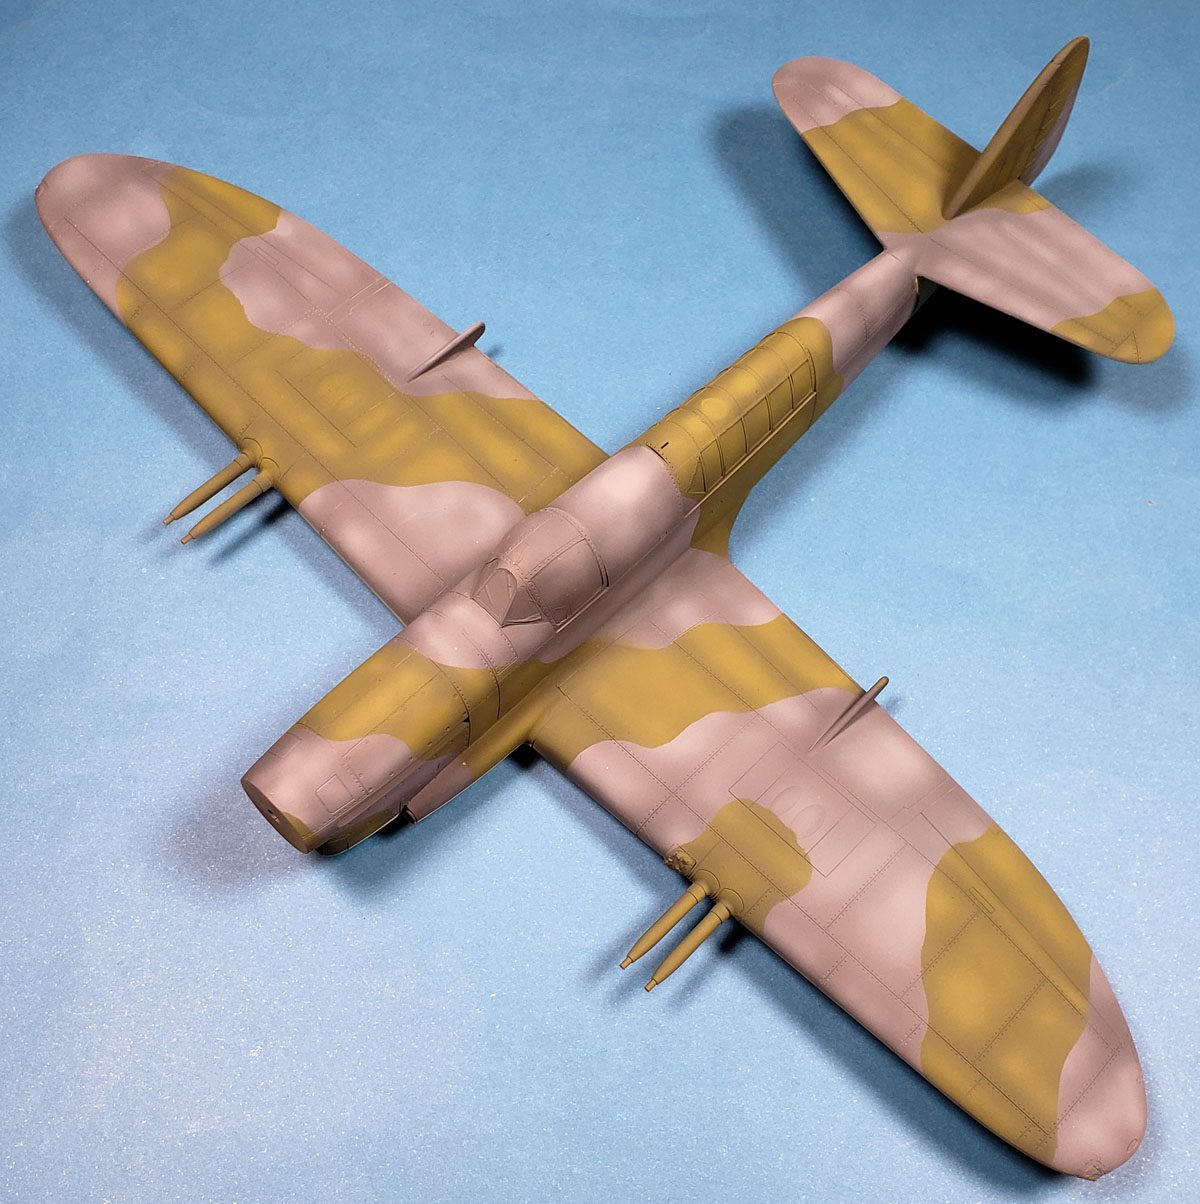
In a previous article, I’d outlined how to apply a single color distressed finish to a model. And in another blog entry, I’d covered masking off models for airbrushing. On this Trumpeter 1/48 Fairey Firefly Mk. I, I’ll combine those two elements into a two color camo scheme.
Please do keep in mind – this is one method among many. You will find far better examples among modelers with actual, inherent skill. This method, though, can be applied by an modeler of any skill level. Basically – any idiot. I know this to be true, because I am chief among the idiots. 😀
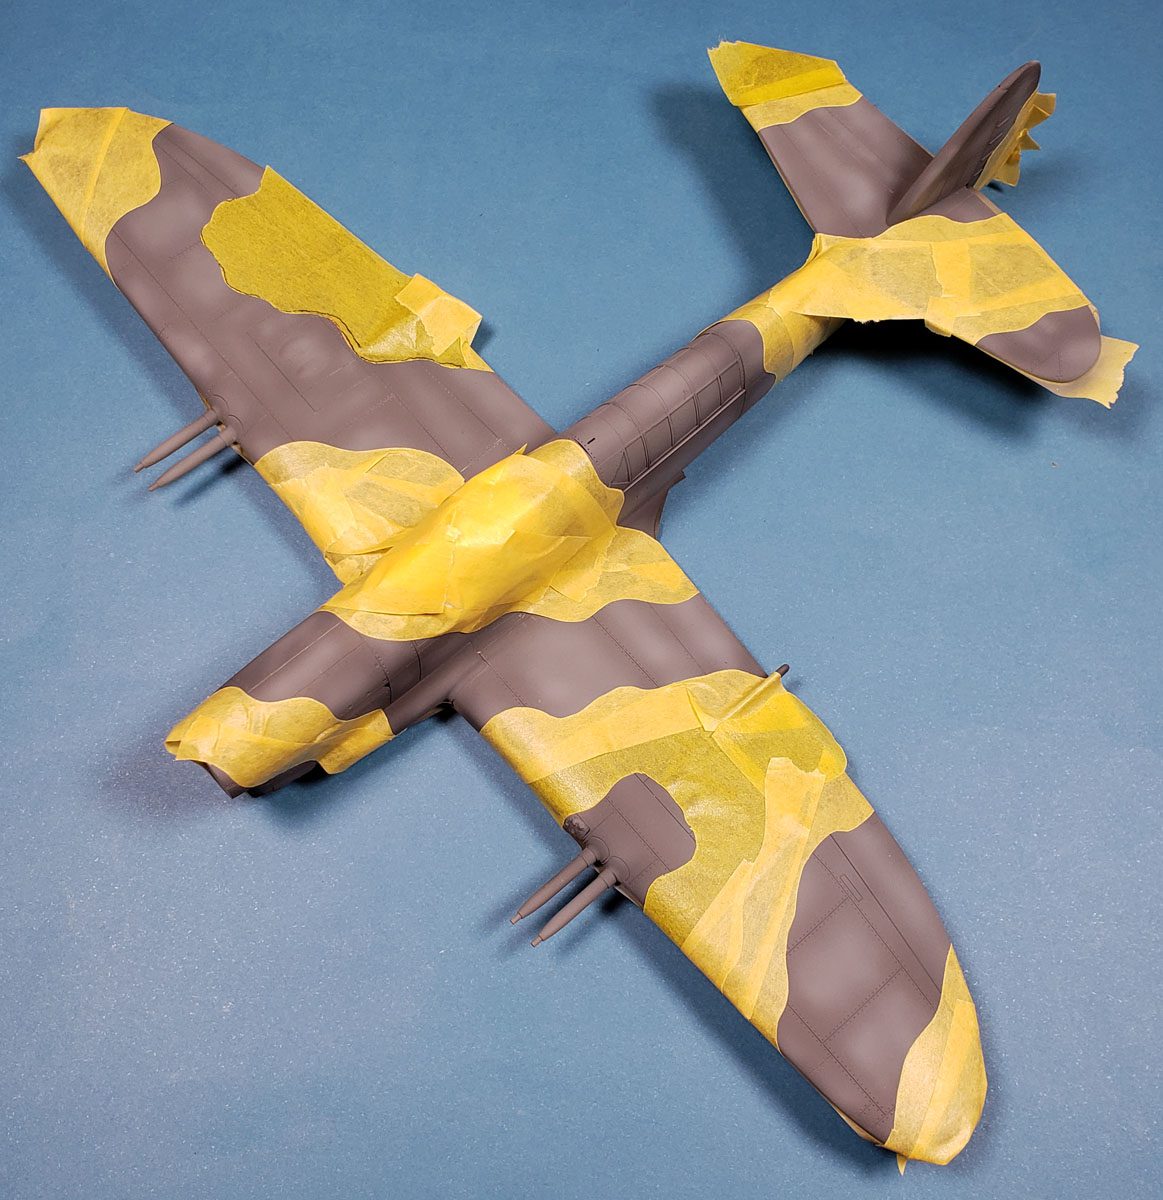
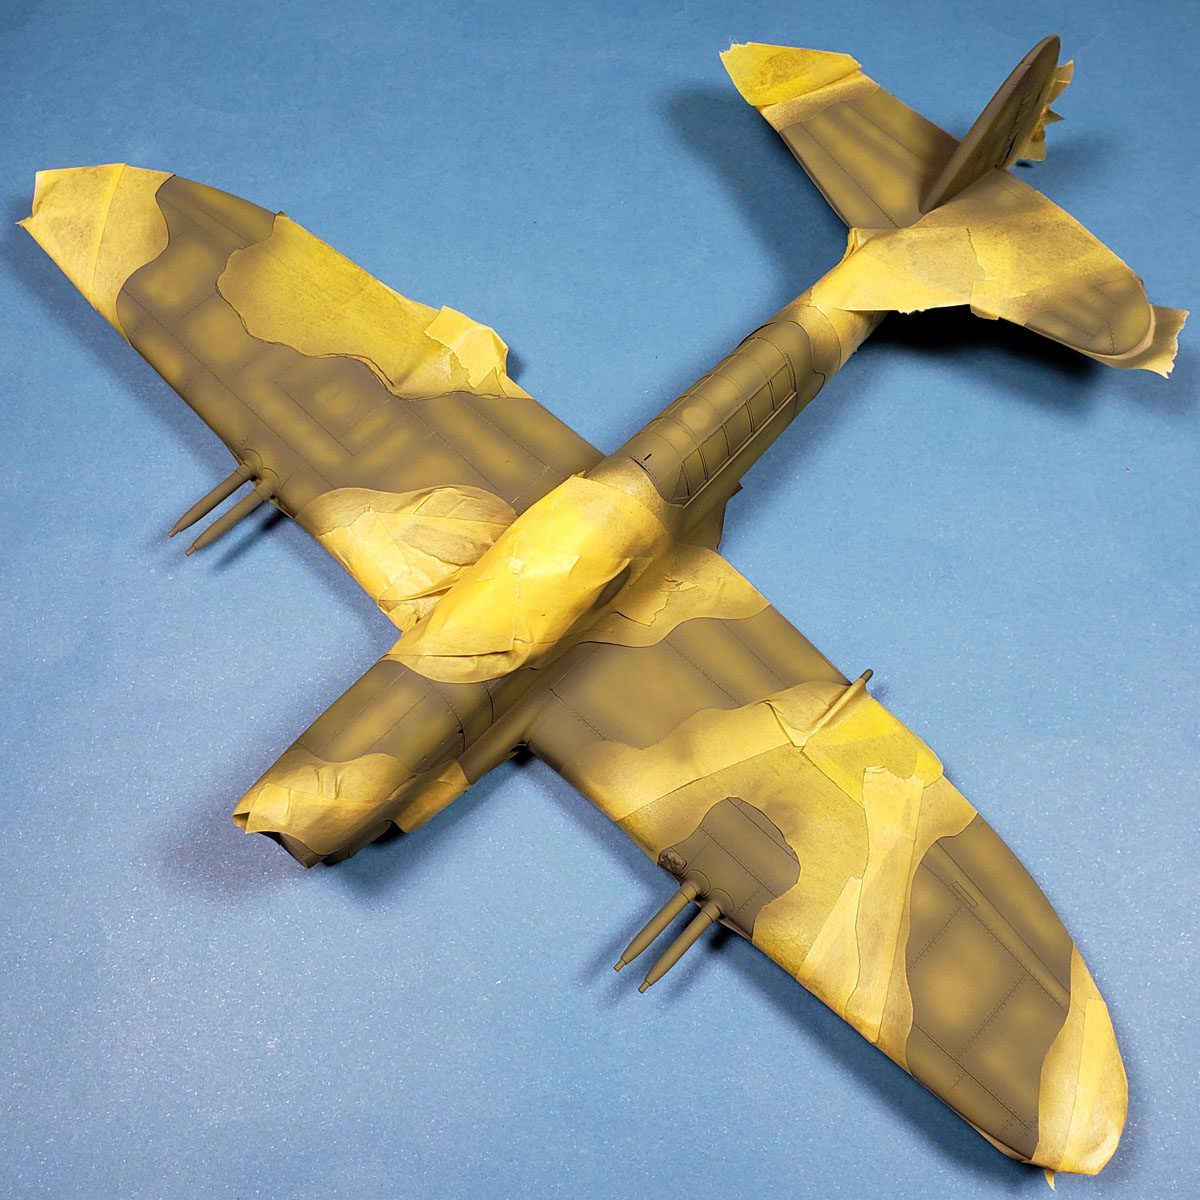
First, you’ll need a model, assembled and primed (if appropriate). At this stage, the Firefly has been primed in gray and its undersides have been painted and masked off. Some of the underside color is evident, but because the paints I will be using are quite opaque, I’m not worried. If you think that such overspray may affect your own model, simply spray a bit of primer on to “reset” everything to a solid base.
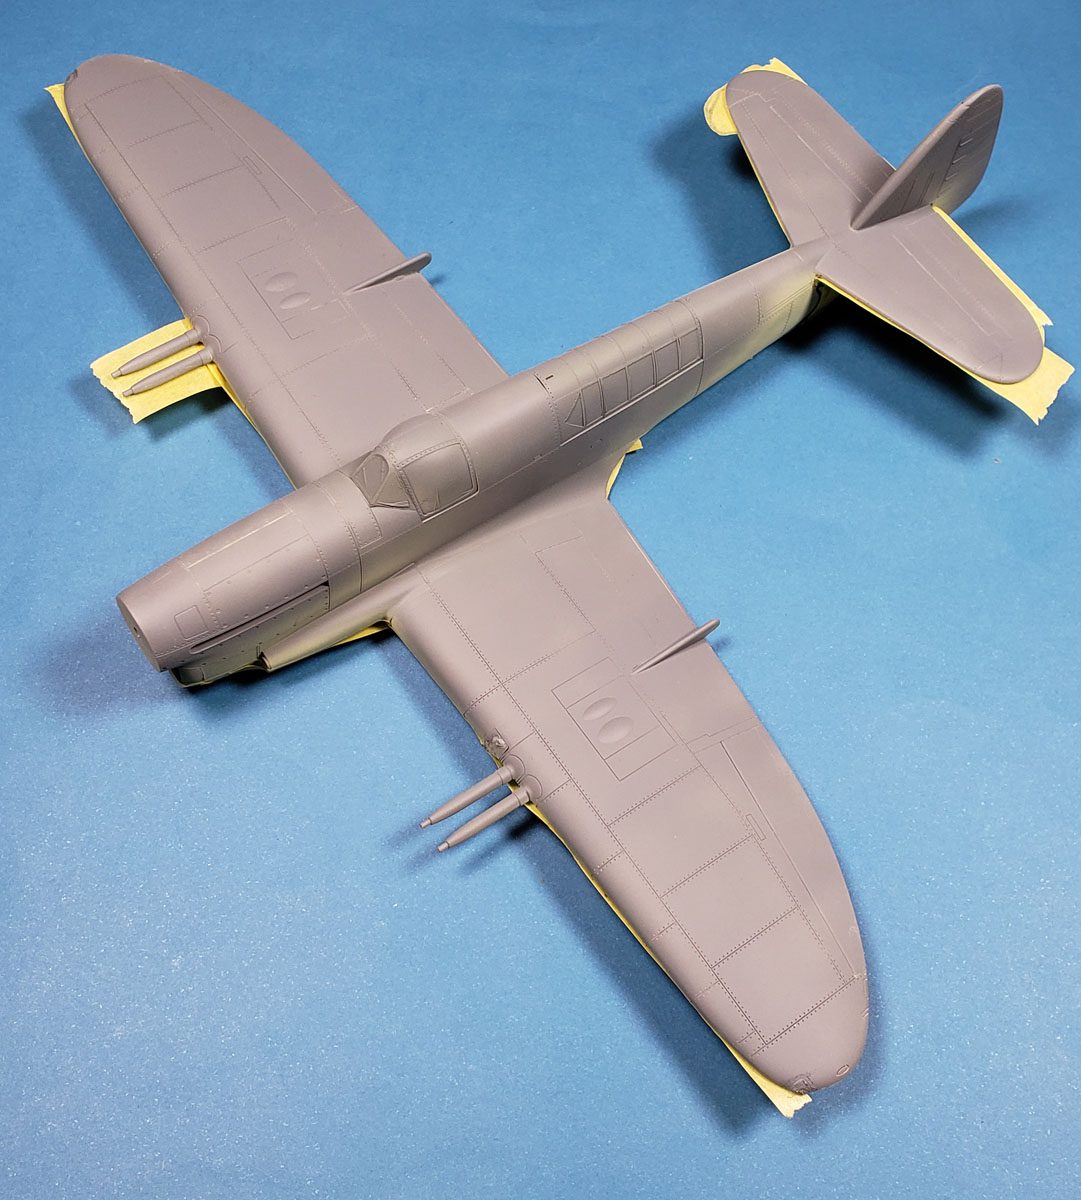

Next, I apply the base coat of my first camo color. If the two colors have a good level of contrast, then apply the lighter color first. While the two colors I am working with don’t have a lot of contrast, I do know that the gray will be easier to cover than the greenish color, so I start with gray. While I apply it all over, if a few areas peek through, that’s not a problem.
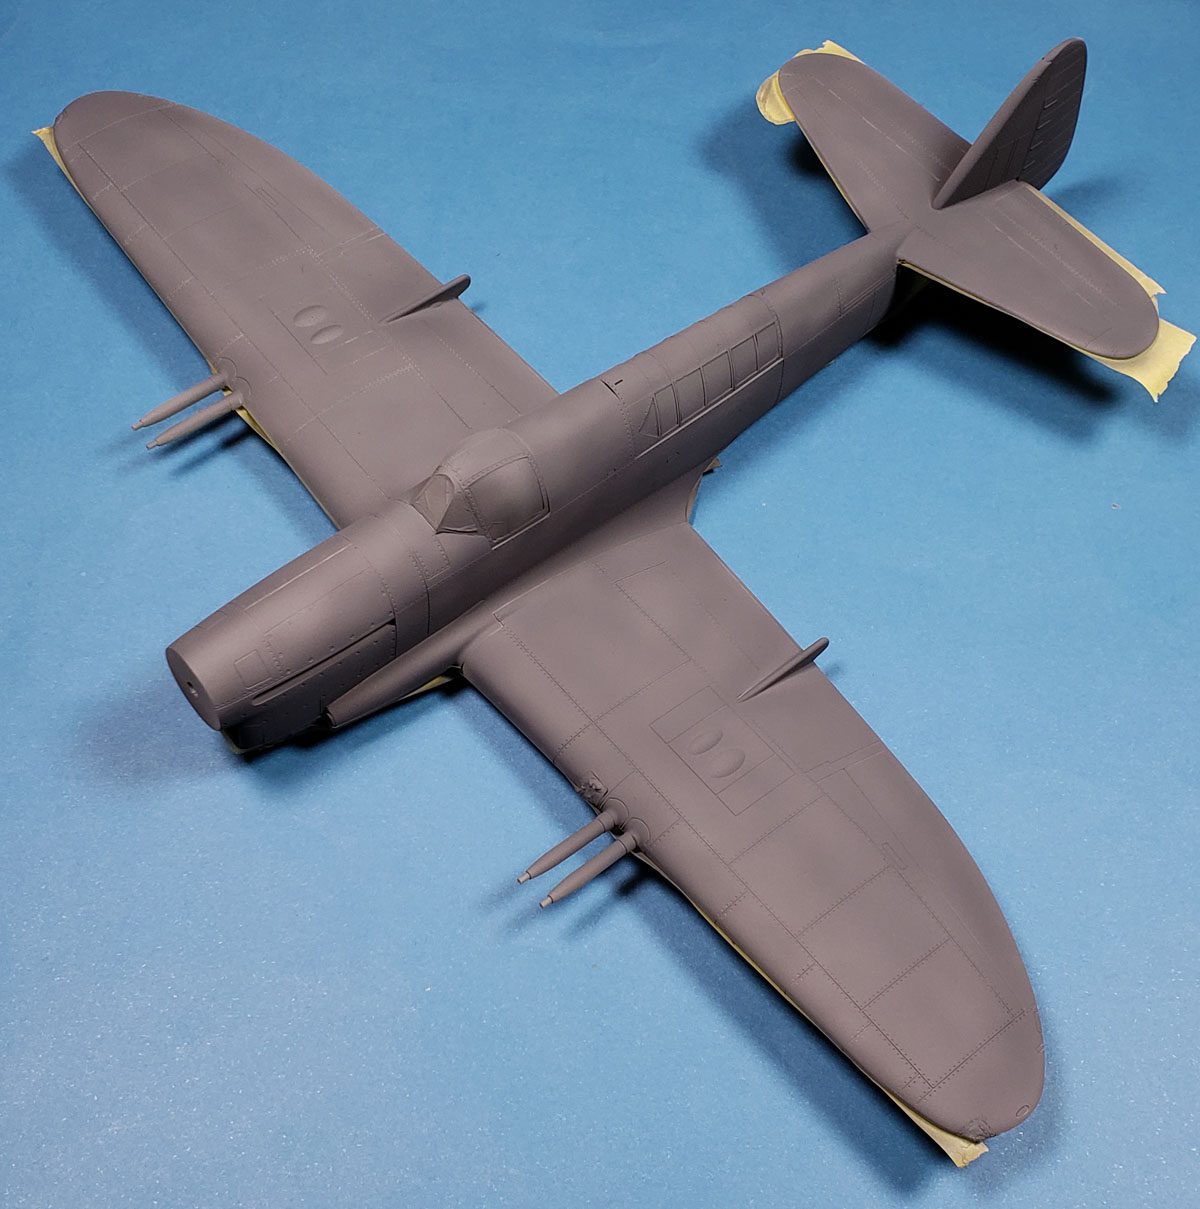
With that base color on, white is added to the airbrushes color cup. The goal is to lighten the base to a very high contrast look, very over the top. I mix it right in the color cup, and then thin it heavily. The goal is to have a mix that requires 3-4 passes to build up the color. Control is the key here. While lowering the air pressure can help at this stage, I don’t always do so. If the paint is thinned well, trigger control can be enough. On this model, I wanted more stark panel lines, so instead of misting it over the entire airframe in haphazard fashion, I focused within panel areas for the most part.
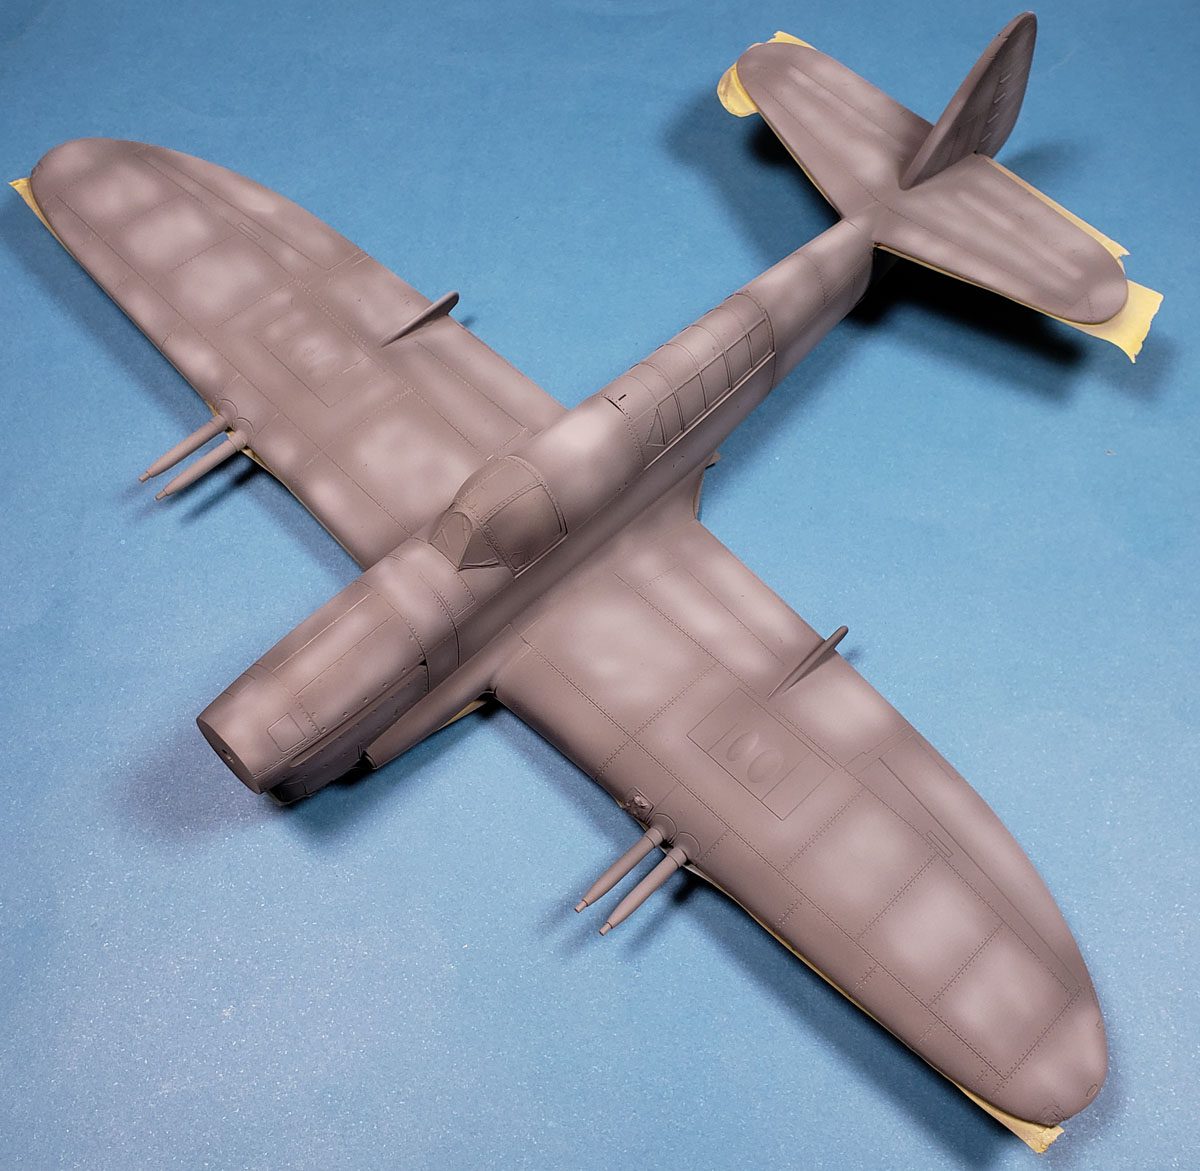
With those colors in place, I added some of the base color back to the mix in my color cup. While there is no magic to the ration – it’s simply a way to remember it – I typically add half the base in that I did of the white. As I’d added 4 brush loads of white to the mix, I now added 2 brush loads of the darker gray back in. Even more thinner is added. Application is done initially by misting on a light coat over the whole model, which begins to blend the colors together. I then started working on closer, doing spot blending where I thought it was needed. The color shift that results is slight, but I think it really helps reduce the starkness of the initial fading.
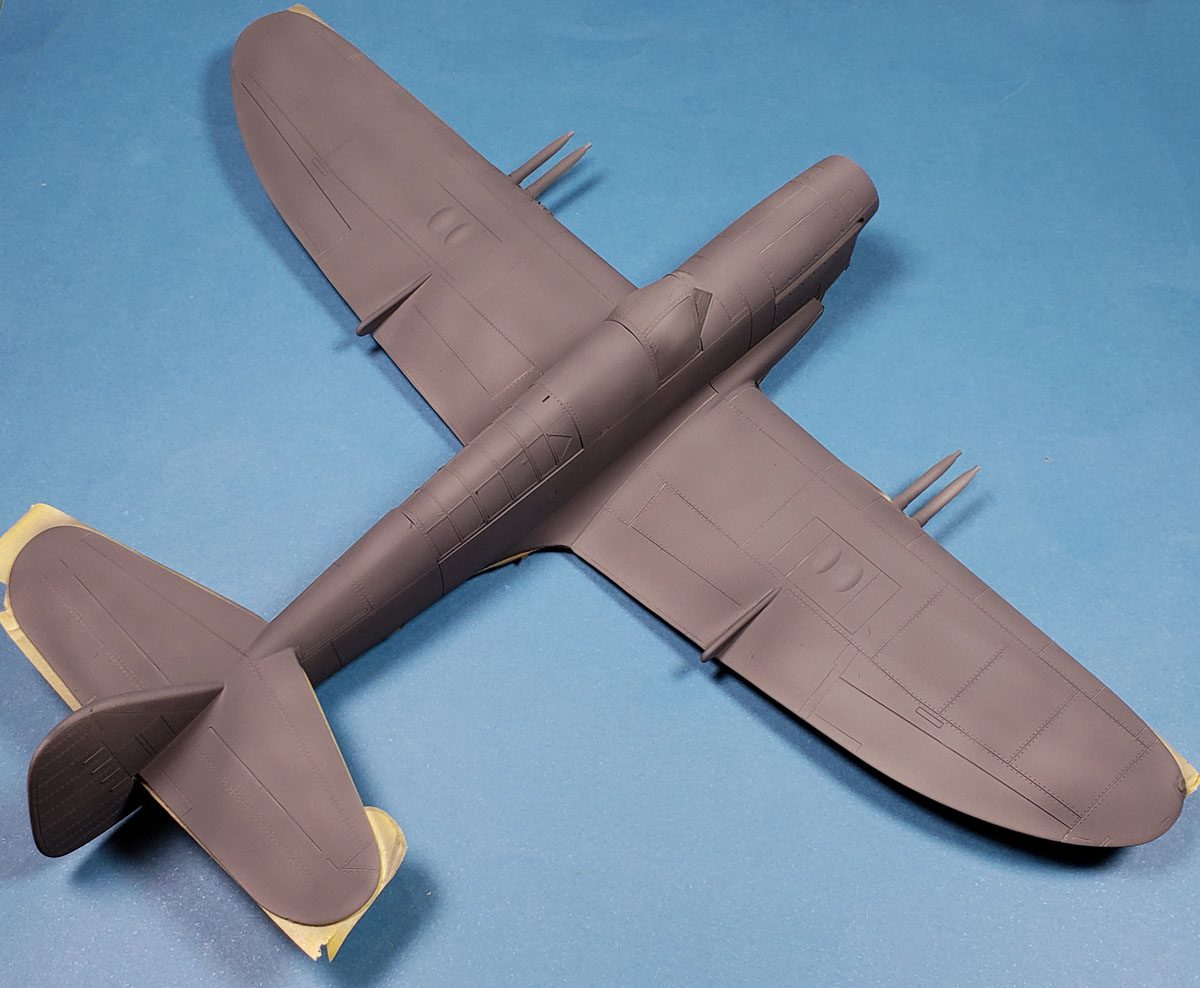
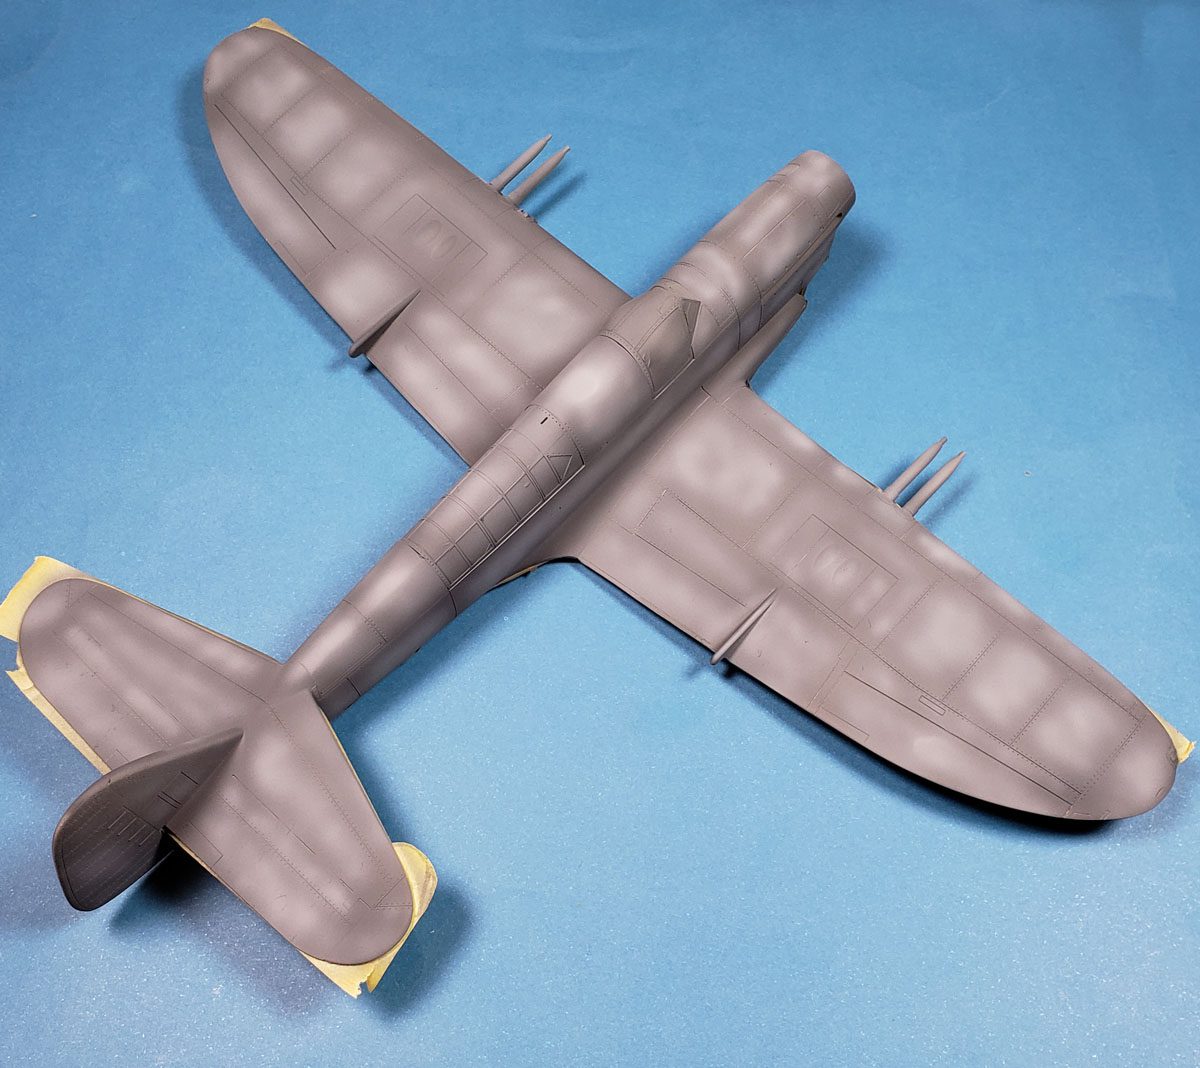
With the gray base down, I gave the model an overnight drying time, and then applied the masking as outlined in the previously mentioned blog reference. It’s very important to make sure you detack your masking tape. While fixing paint lift is always a pain, it can be especially difficult on a distressed finish. Working my way through far too much tape, the camo scheme was masked off.
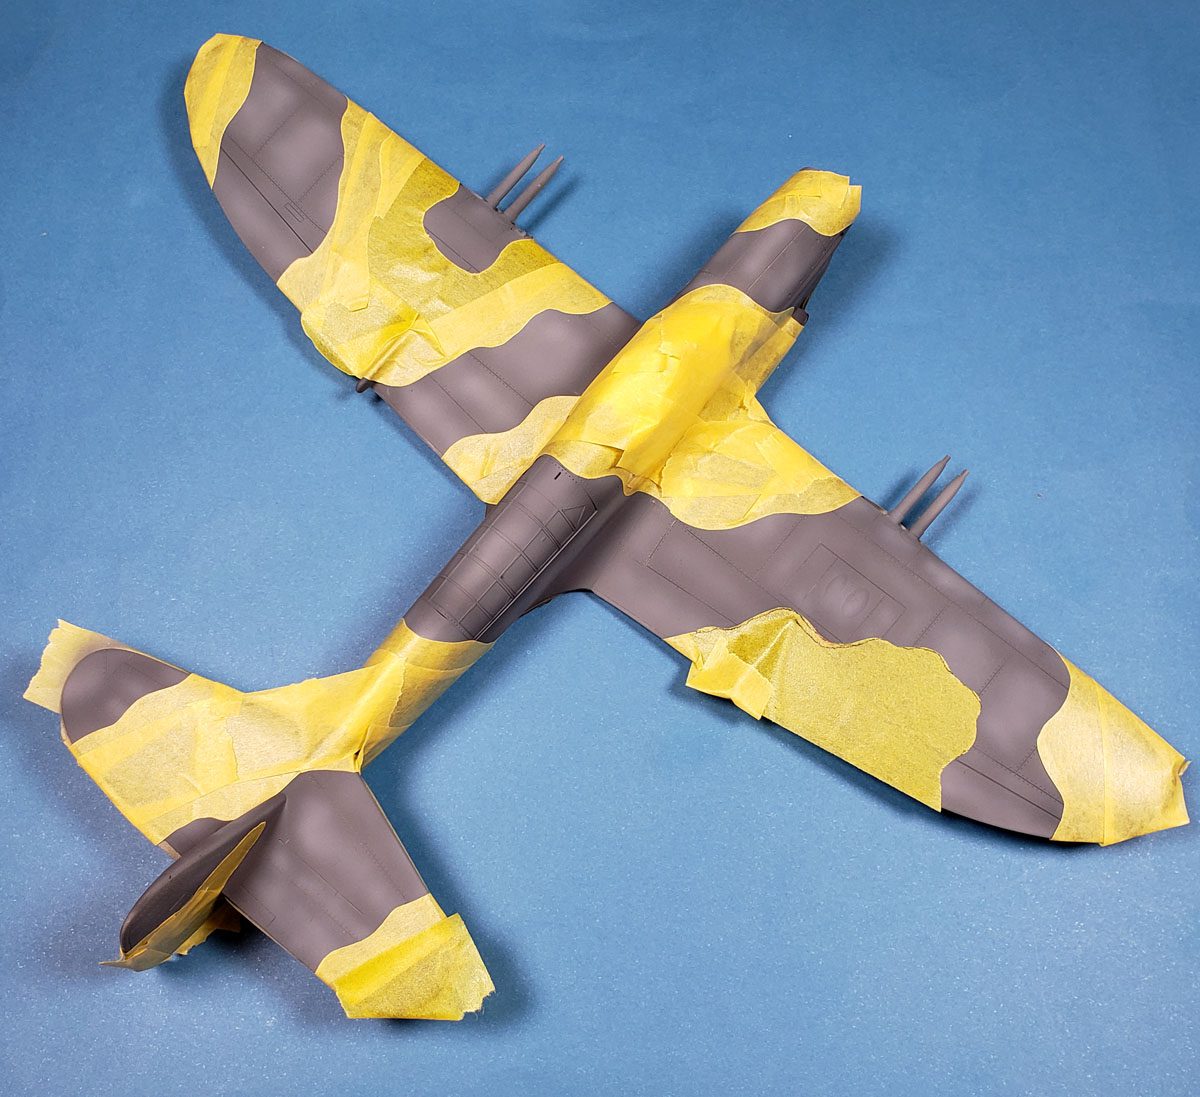
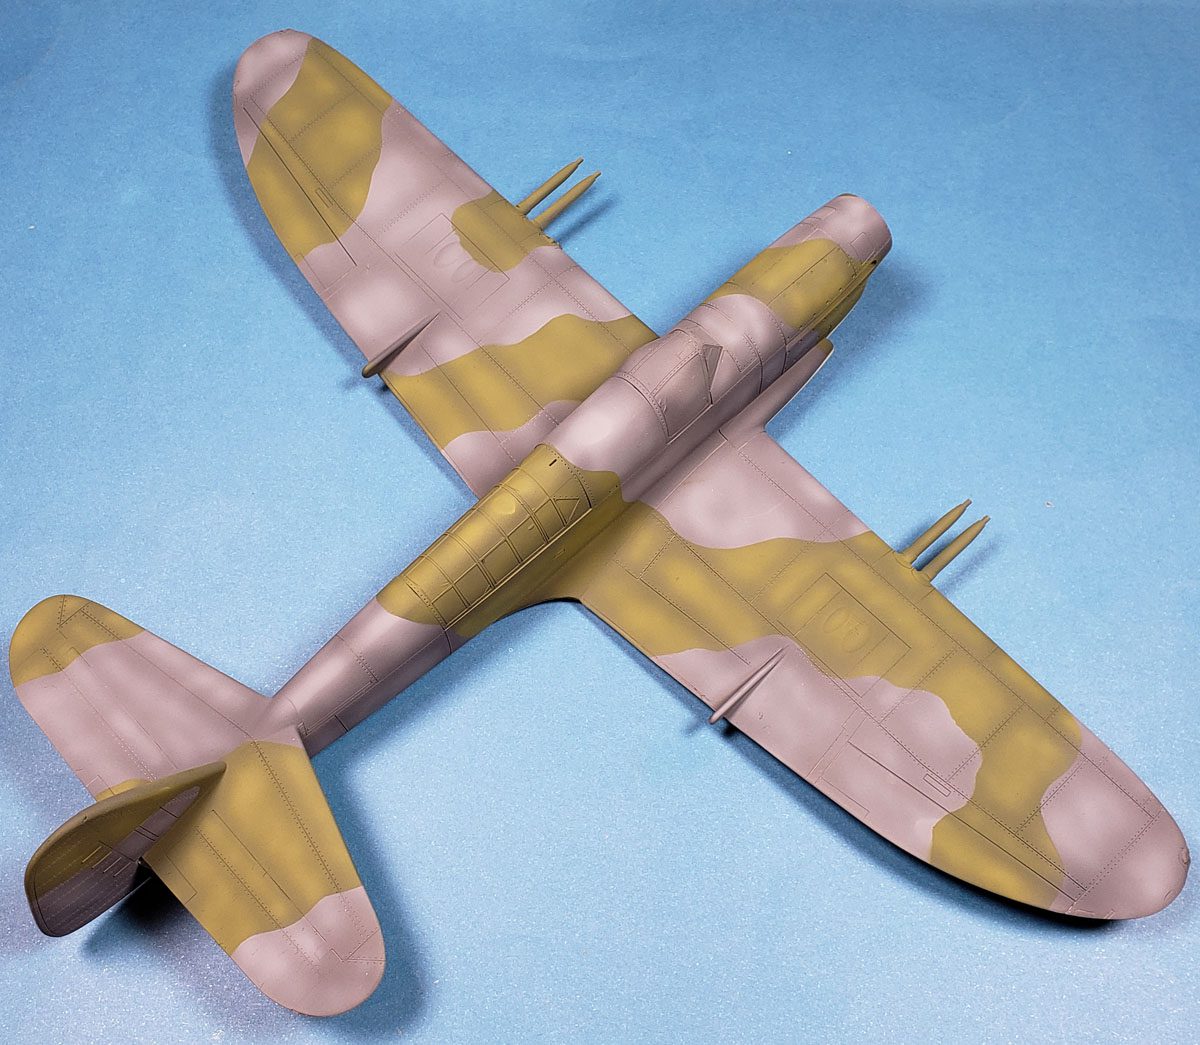
From this point on, the process is essentially a repeat of the previous steps, simply with a different color. First I applied the second base, though this time I went for a more full coverage.
Using the same method as before, I lighten up the second base color. Because the second base is green, I opt for a more yellow-green color. I could add white, but that would shift the already grey green color further gray. I actually want to “punch up” the greenish tint a bit, so the yellow-green choice works. Of course, your own color choices will drive things if you follow this method.
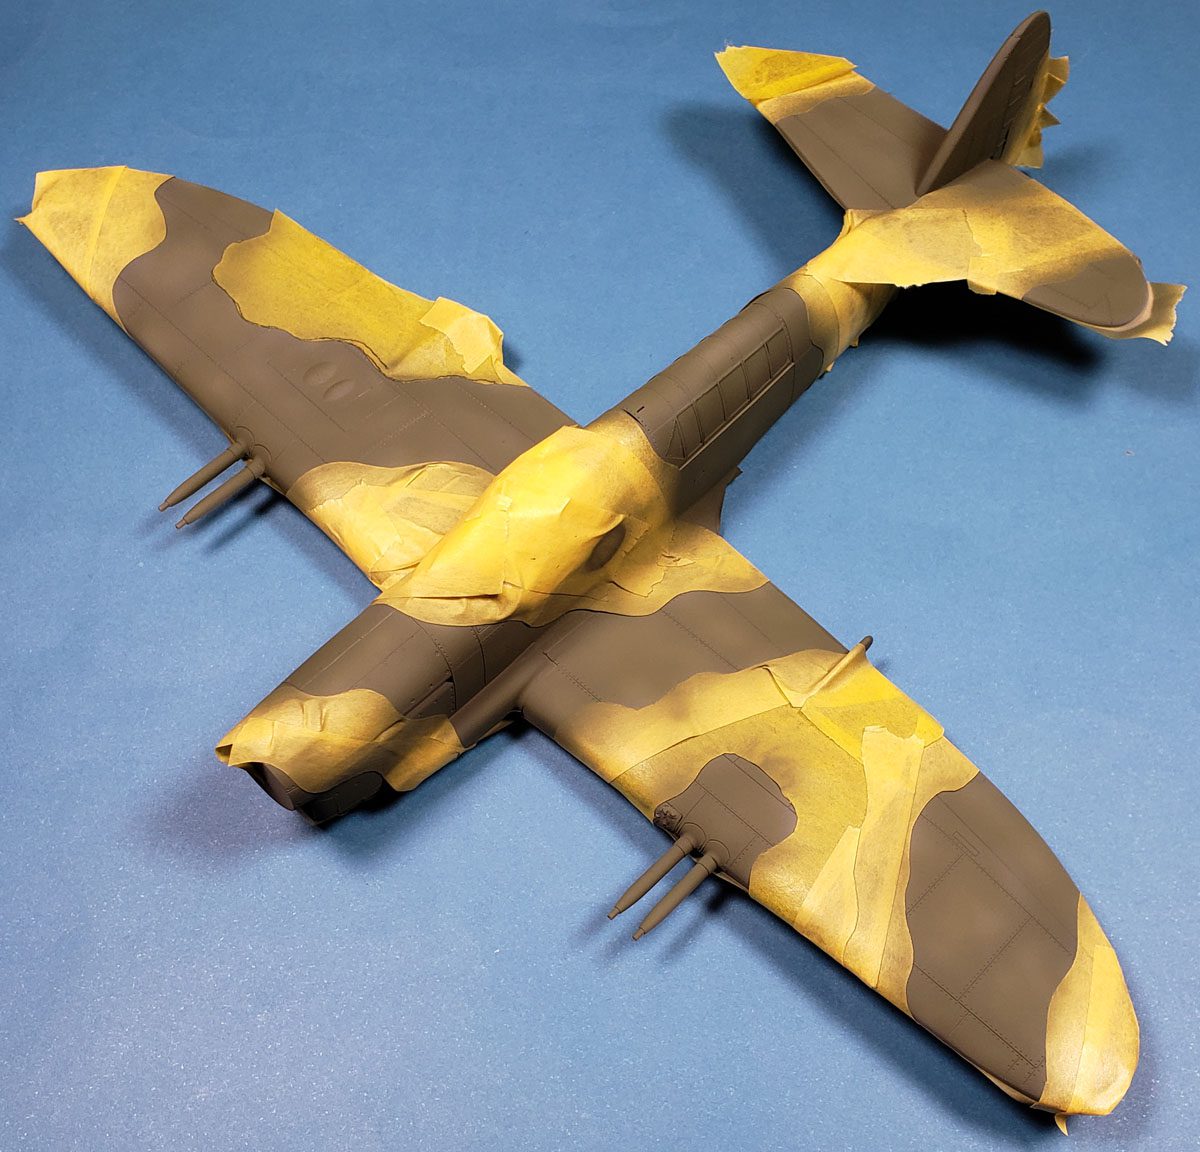
Again – a high contrast look is what I wanted to achieve.
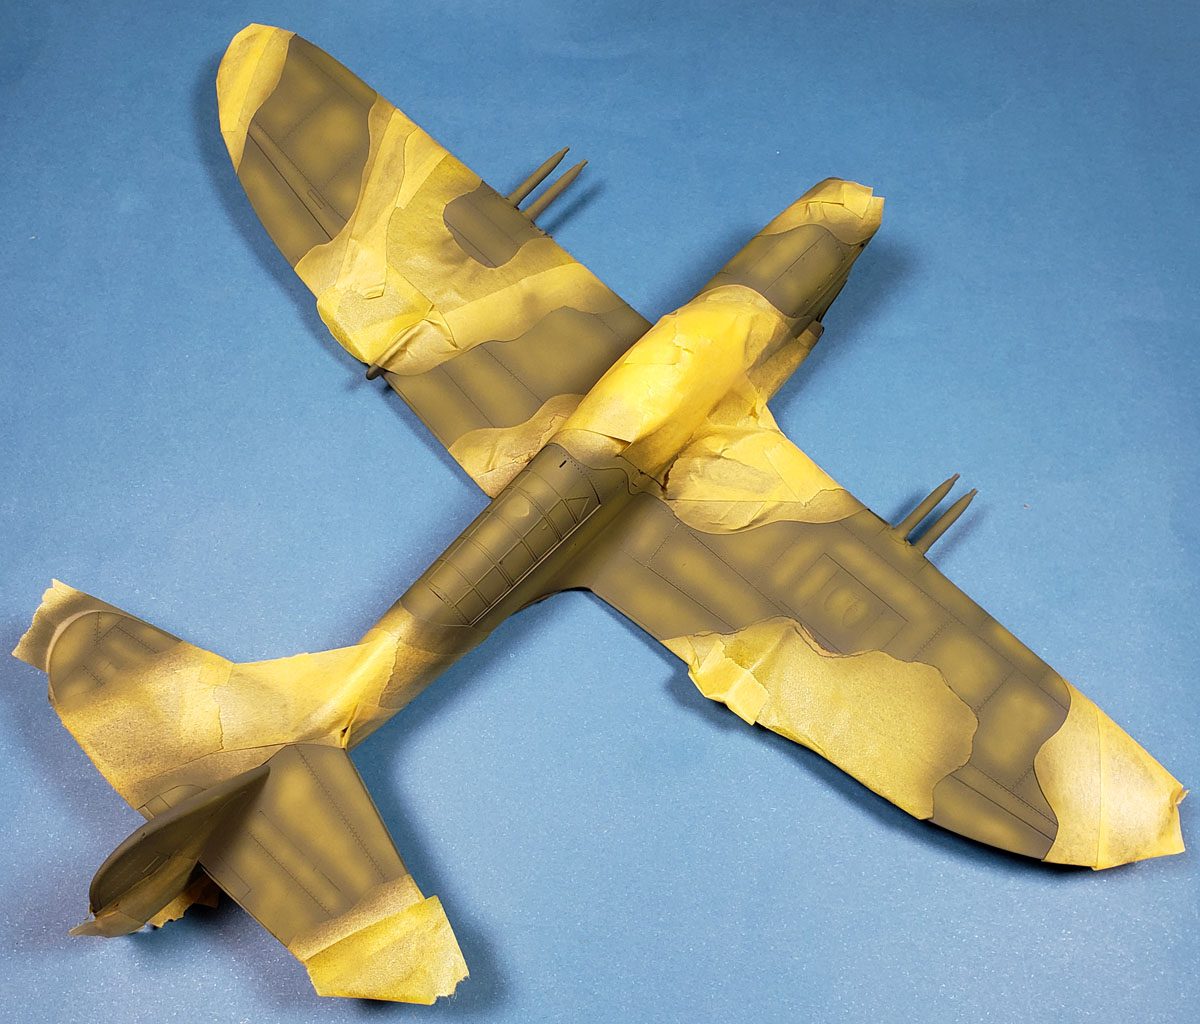
The final coat applied was just as before – I added back half the amount of the second base in relation to the amount of yellow-green I’d lightened things up with in the first place. This was then misted on, generally at first, and then with spot application where I thought it was needed.
Ultimately, your own eye and preferences must be the guide to “right” in applying this.
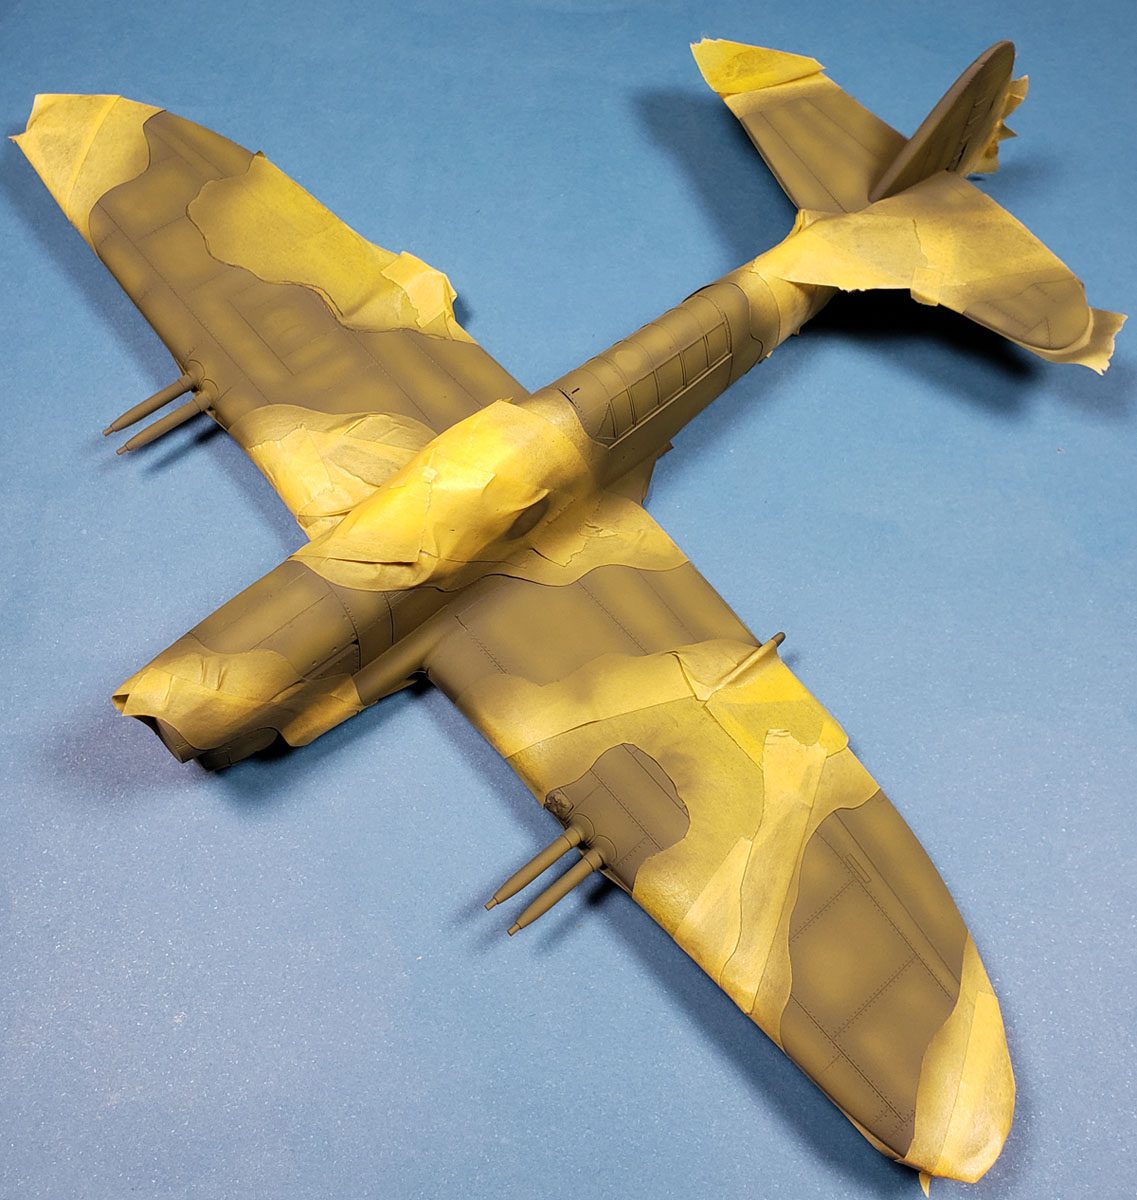
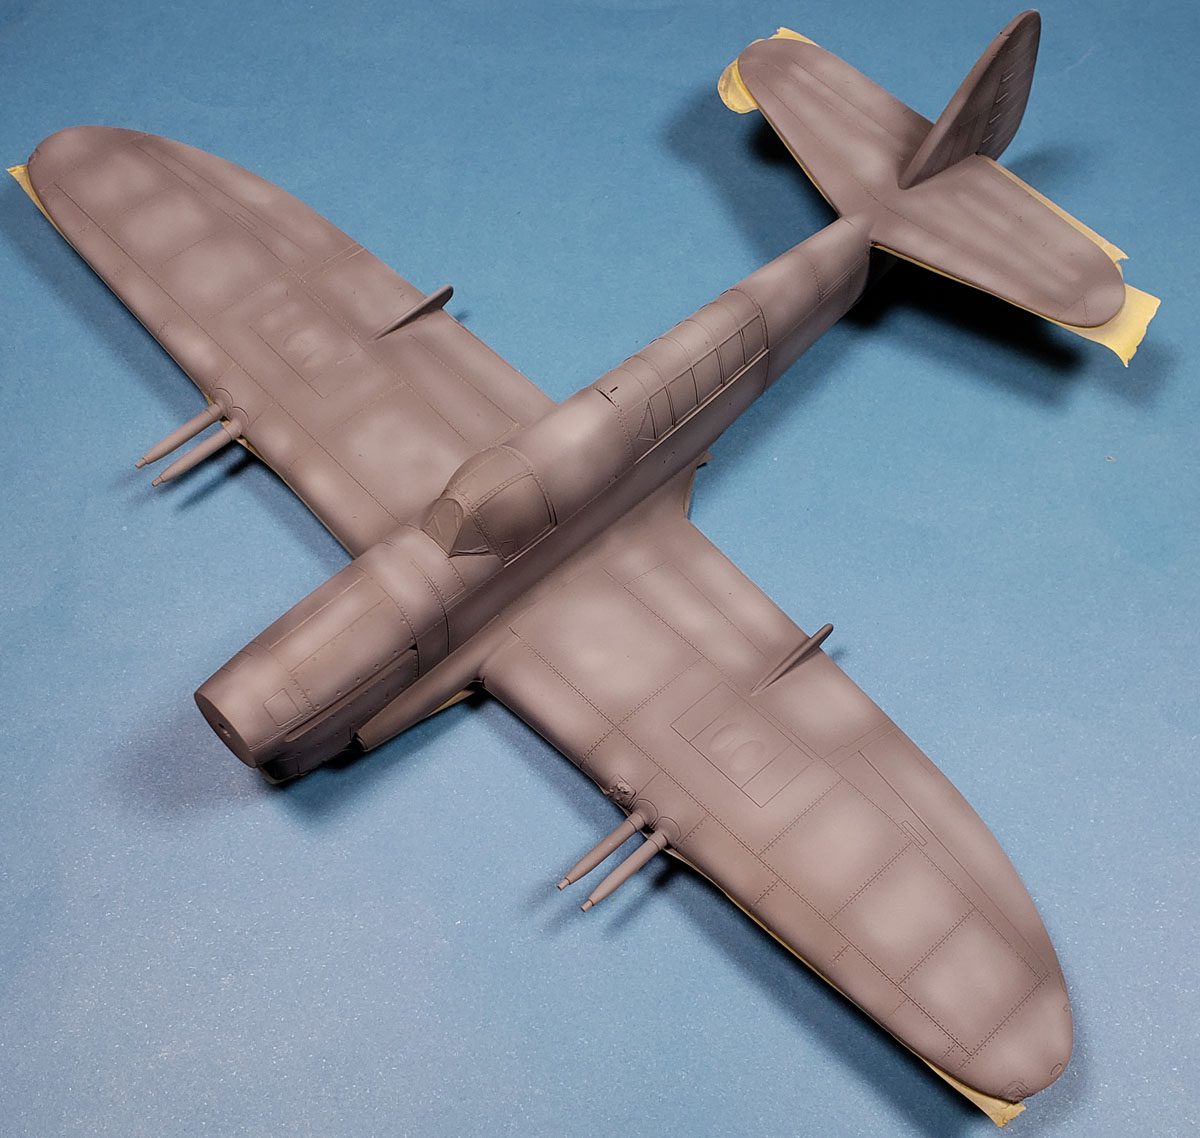
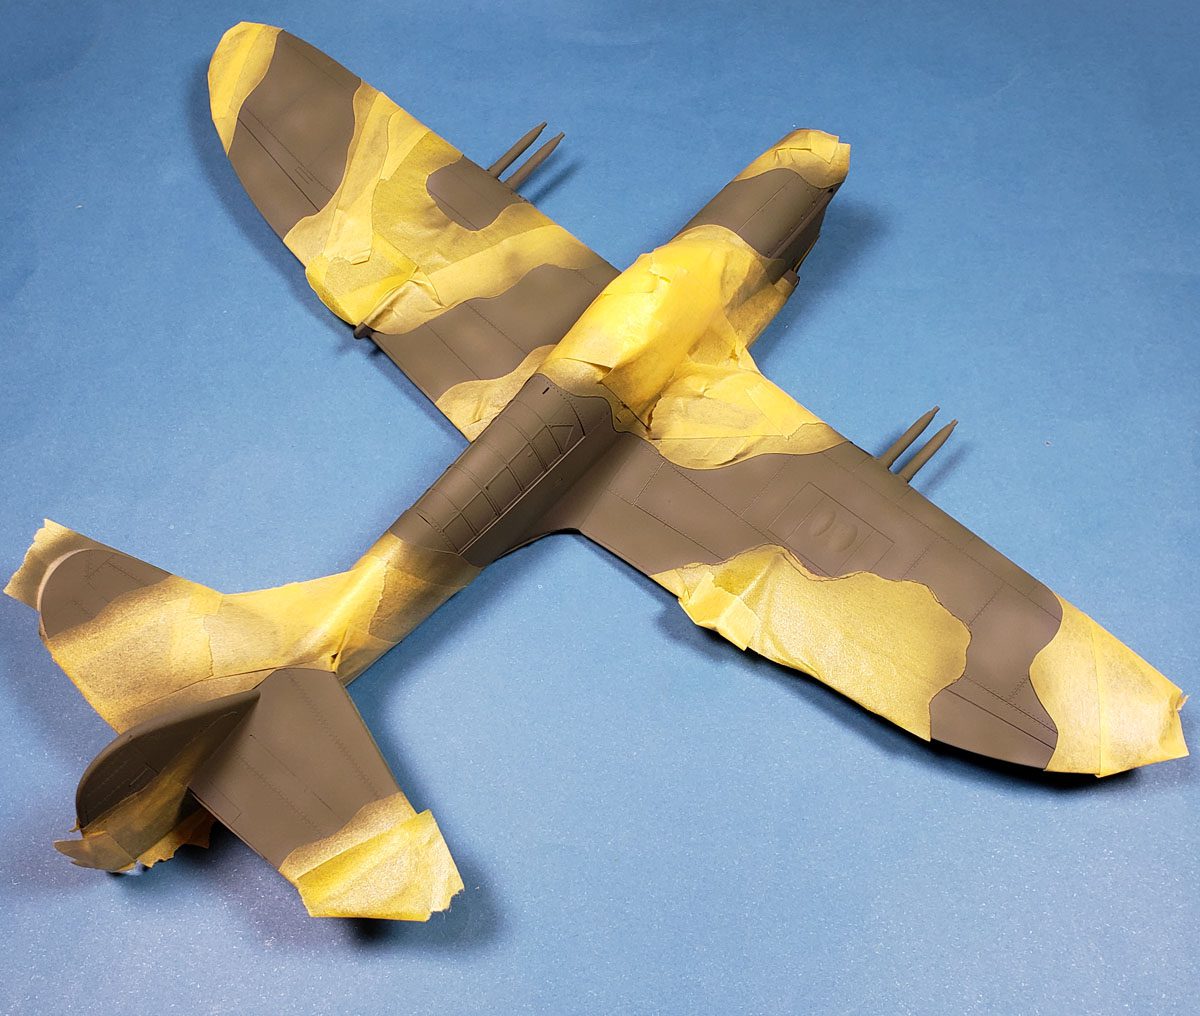
With all colors now applied, the moment of truth arrived – unmasking.
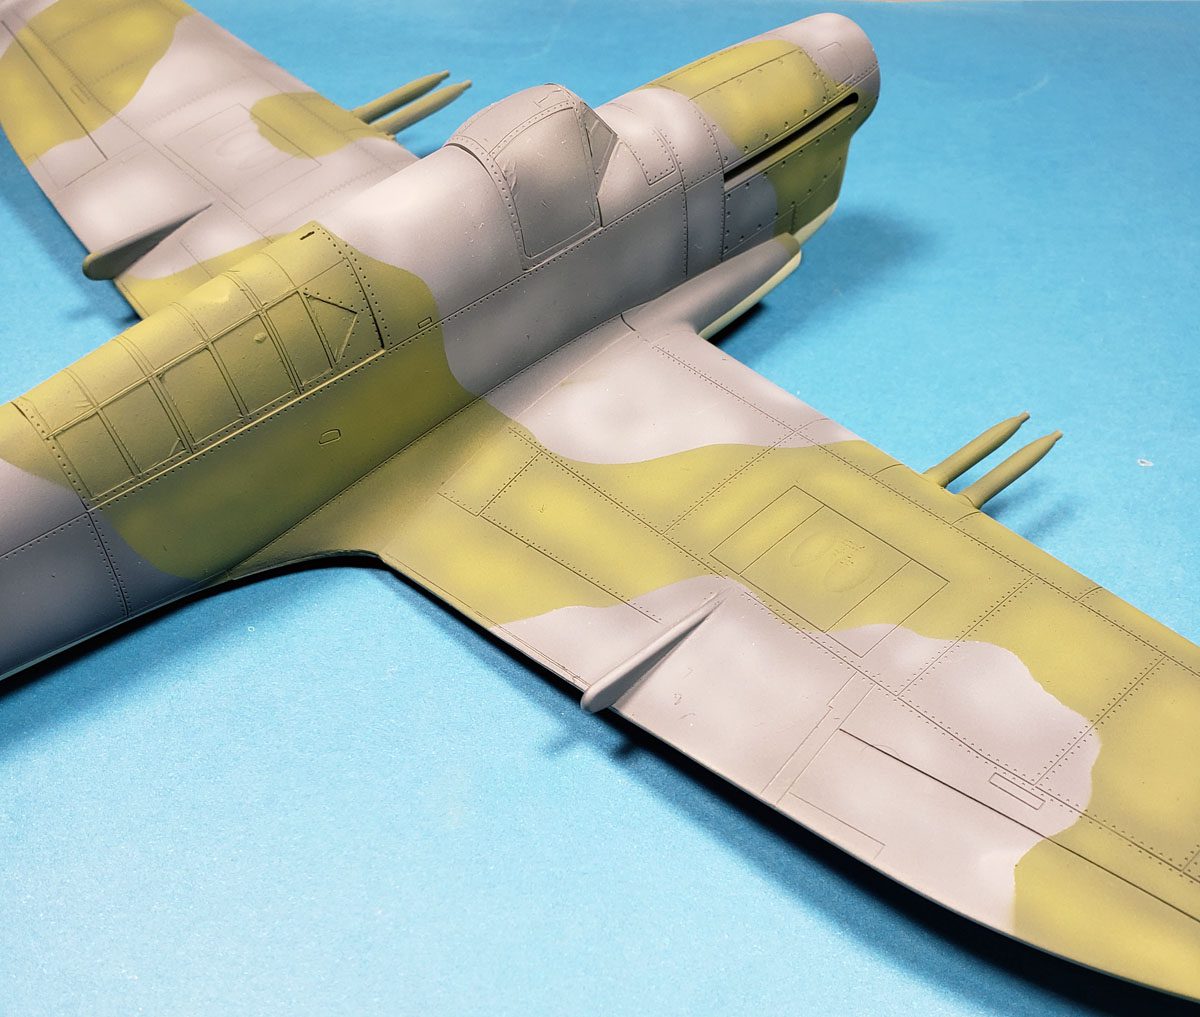
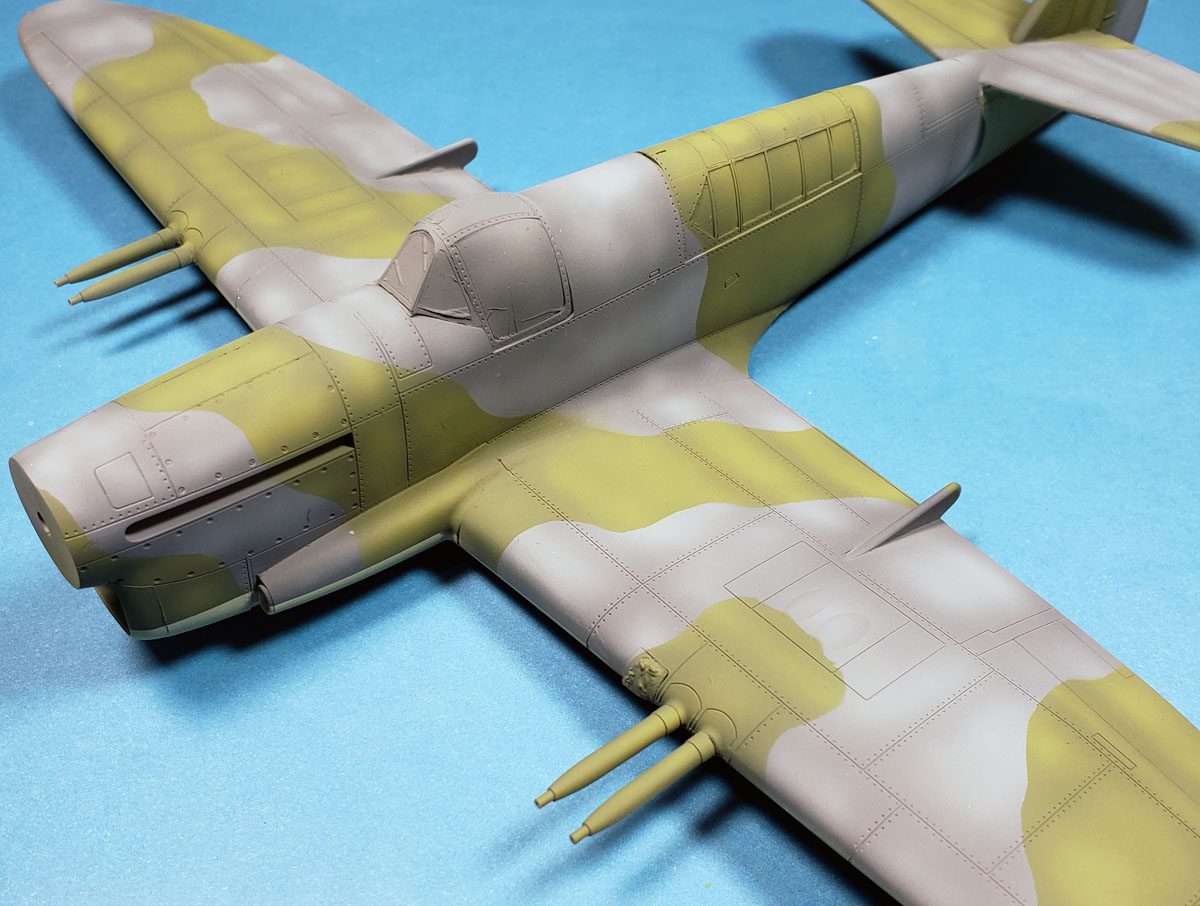
Thankfully, there was no lift, and the end result was one I was happy with.
Certainly this is a more stylized approach. I lean far more towards the “art is modeling” side of things than I do the “Hey, check my low IPMS membership number” side of the spectrum. 🙂 So you may not like the result – that’s OK. Don’t overlook the technique though. With adjustment, this can be made far more subtle (or more drastic!), and is useful on any genre to help add tonal variation to any model.
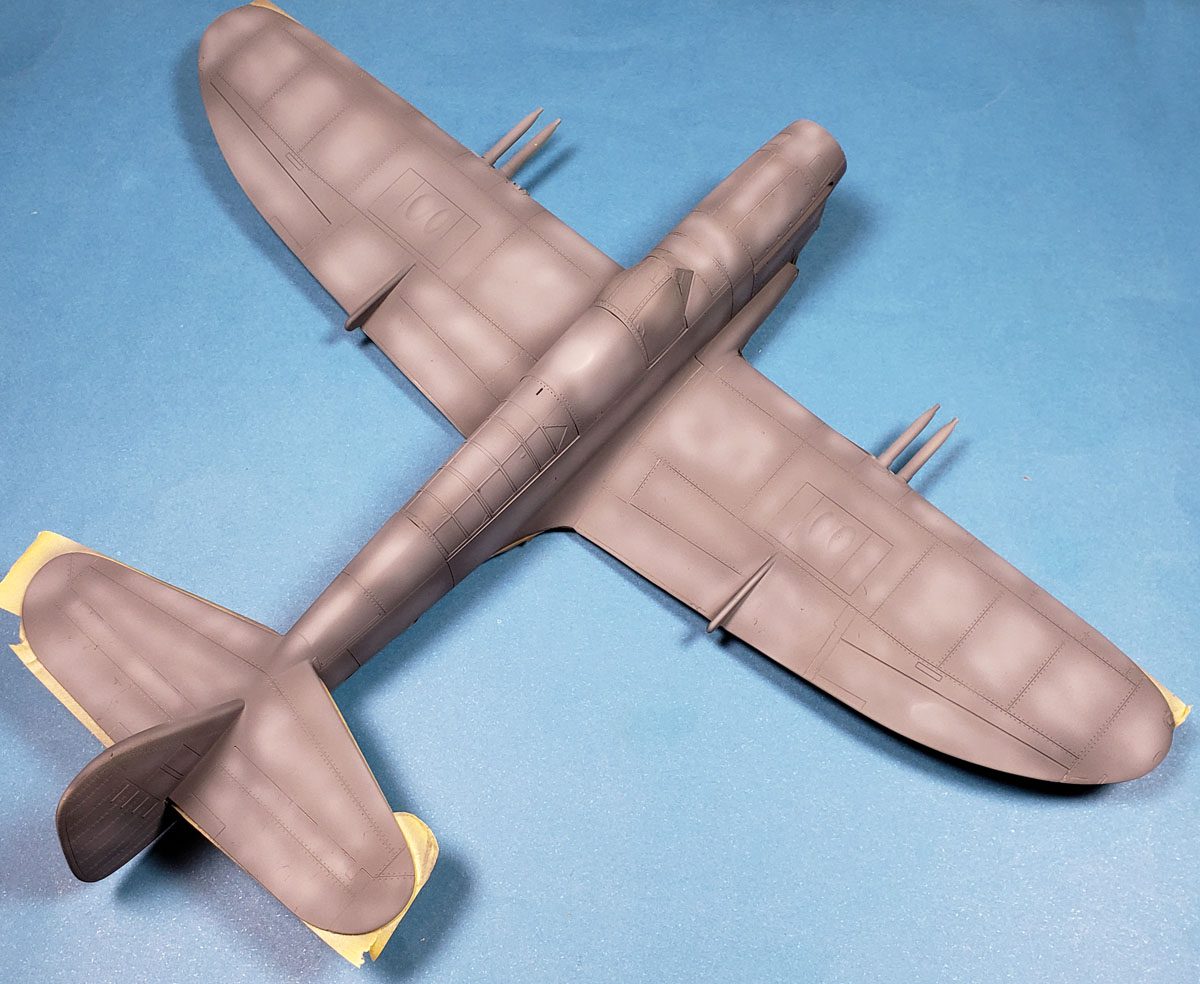
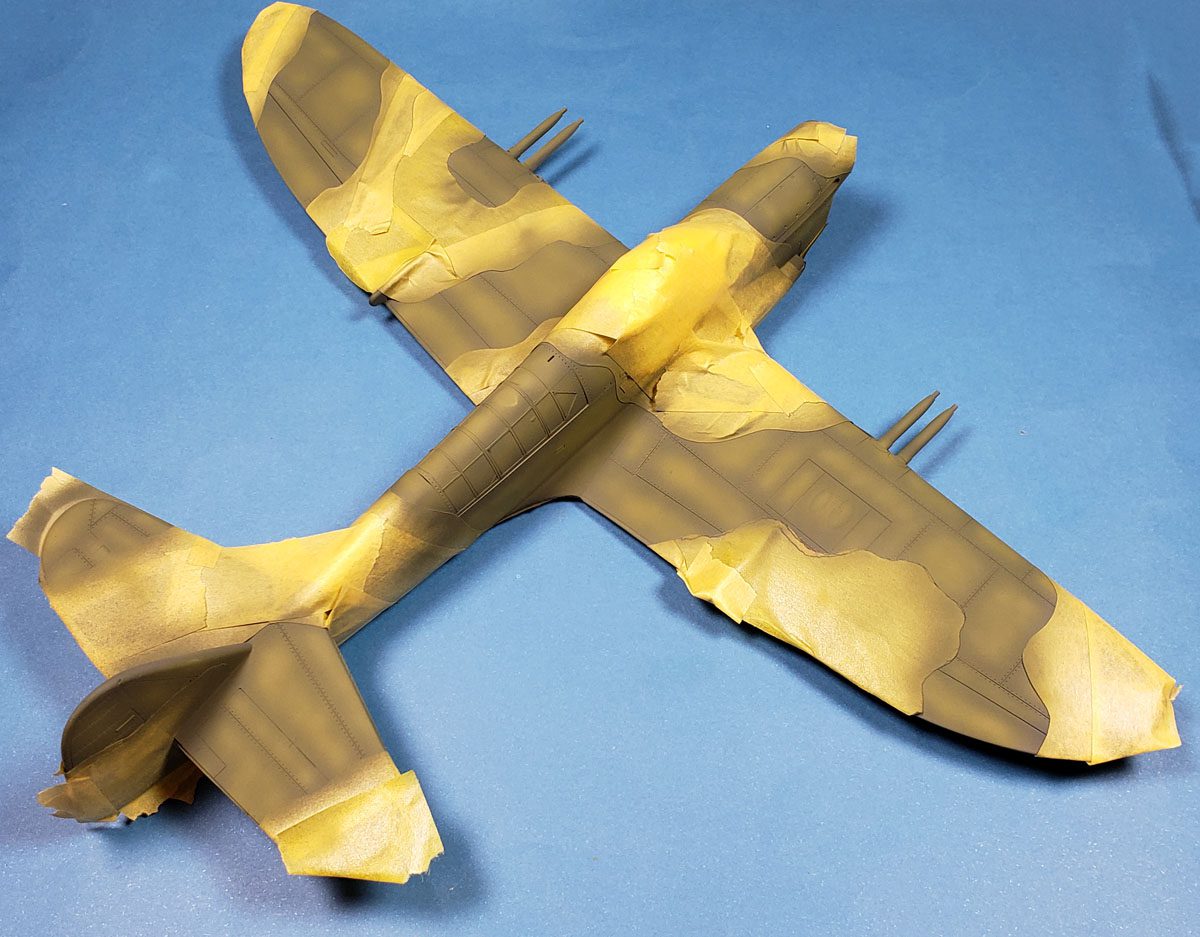
It also must be noted that later layers tend to blend and mute the work done thus far, so having a more stark look now will make sure that the tonal variation still shows at the end. How much will it show?
Much like my basketball days, only repetition of the task will reveal that. While this is not a hard technique by any stretch, if it is new, it may seem daunting. Stick with it. Do it over, and over, and over. While painting milk jugs and spoons and pieces of cardboard can be good practice, nothing can replicate building models like actually building models.
I eventually did learn to shoot the ball reasonably well, and dribble enough to get by, and pass and catch and jump to a degree that allowed me to stay on the team. I was never the starter, never the star. The announcers never called my name except in passing, as I went in to give the players who could actually play a brief break.
But I had fun. I was on the team. And still have the letter jacket, proudly hanging on my closet.
If I am honest with myself, I’m the same way with my modeling. I’m just a guy who builds, and if I have any good result, it’s more a product of repetition than anything else. I’ll never be the star of the show, or the one who wins the games.
I say that though, not as a veiled attempt to gain praise. Rather, I point that out to close with two thoughts.
Anyone can do this.
And it’s about fun, not perfection.
Have fun in your hobby. If you’re not, you are doing something wrong! 🙂
Leave a Reply