

As I’ve built more Warhammer 40K kits, the question comes to mind “why didn’t I start building these sooner?” Of course, I somewhat know the answer… I focused on aircraft. Yet this recent genre shift to 40K, scifi, and Gunpla has made me realize how much of the modeling world I was missing out on by not at least giving other genres a try.
It’s certainly been a fun process. First was the Land Speeder Storm, then the Chimera, and now this Razorback. Each kit has been remarkably enjoyable and trouble free. No struggling with fiddly parts, or gobs of seams lines. No worry about preserving fine recessed detail. The very exaggeration of detail and proportion makes painting and weathering a joy.
I guess the only complaint I have is that so many of the kits are priced a bit steep, but even in that I understand the logic. I don’t necessarily agree with it, but I get it. The focus is on the value in the game, not the plastic in the box.
This Razorback is a great balance all around. Plenty of nice detail and room for weathering. Yet at $35, it’s not too bad a price. And given the fact that I enjoyed this kit so much, and had zero-zilch-nada issues or gripes about it, I can say it was money well spent.
I started by painting the interior, which is more fully detailed in this blog post. I had a bit of fun with it, painting it all up with blood stains and bright shiny lights- a sort of cheeky nod to the very “over the top” styling that seems to be part of the kits and game. Assembly was drop dead simple, taking less than an hour to get all of the major components glued together.
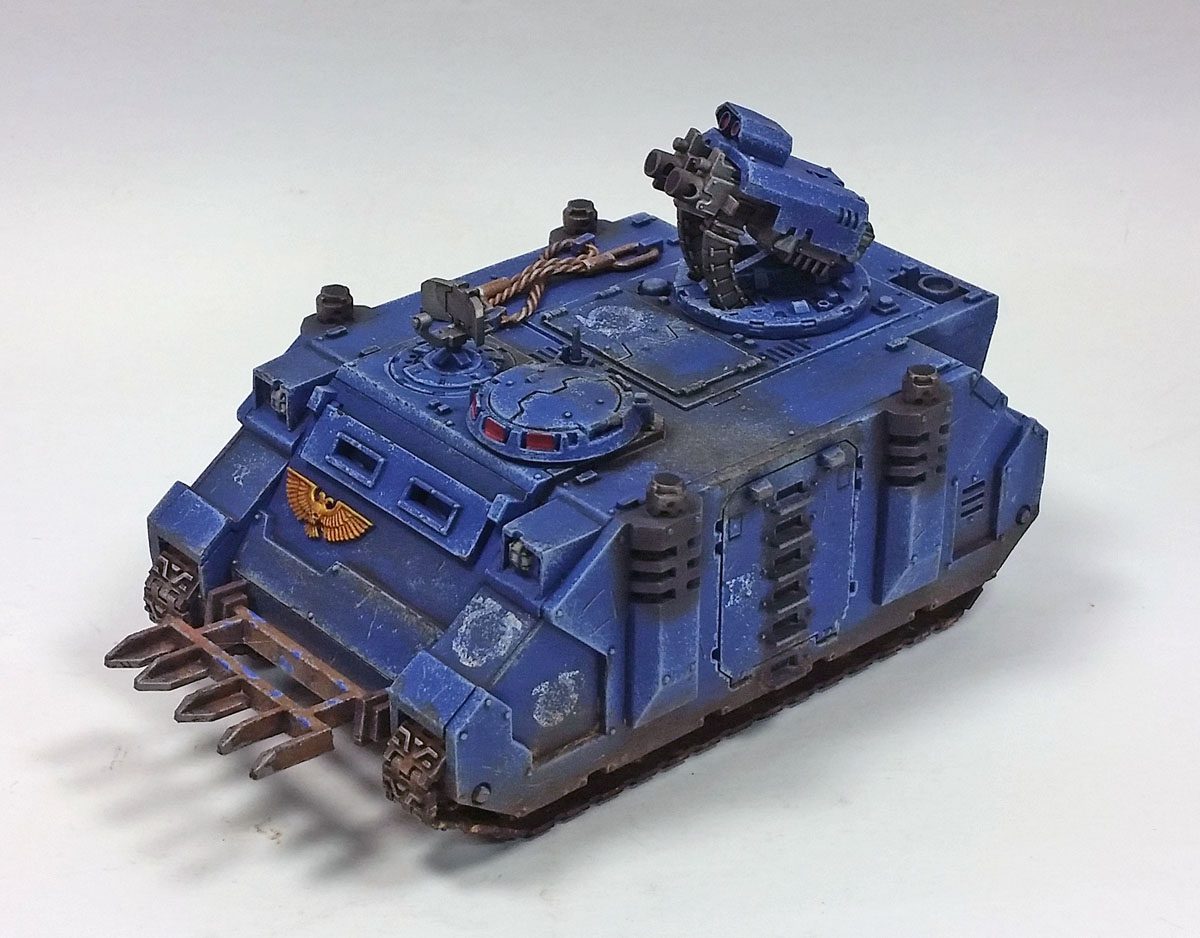
I did leave the upper gun pedestal off, as well as the crew turret ring and hatch, and the tracks. As I’ll eventually sell this kit, I wanted to leave the buyer the option of having it buttoned up, or with an appropriately angry Space Marine poking his head up, yelling whatever it is that angry Space Marines yell. (“We shall know no fear”, perhaps? 😉 )
Adding The Paint
The exterior was primed with my favorite primer, Badger’s Stynylrez, in the gray variety. Next, I airbrushed on a coat of Citadel’s Macragge Blue. While there are Air versions of Citadel’s paints available, I simply used the Base version and thinned it with Vallejo’s Airbrush Thinner. It can be a bit finicky to get the ratio right, but once you do, aside from a bit of tip dry now and again, it sprays just fine. And the paint, when on the model, looks outstanding.
I decided to finish and weather the model using a sort of “hybrid” approach. While I very much like the Games Workshop style – base, shade, layer, highlight – I decided to add a bit more in terms of weathering and general finish, more in line with a “traditional” armor build. But I also wanted to see how using the GW style as a base for those later steps would look.
All the recessed detail was given a treatment of Nuln Oil. While I did try to be somewhat neat about it, I didn’t worry if I colored outside of the lines a bit, as I thought this would contribute later to the weathered look. This was followed up with an edge highlight of Calgar Blue, also from Citadel. On my Chimera, I’d utilized a dry brush technique for edge highlighting. Because that model featured a green and tan camo, the “dusty” look that the drybrushing left sort of worked, giving the paint a more weathered, beaten look. For this all blue Razorback though, I thought that might not work as well. Plus, I knew all 87 miles of edges on this model would be great practice for edge highlighting. So grabbing my handy #2 round brush with a nice sharp tip, I started the edge highlighting.
It turned out to be a good exercise, because I could see as I progressed that I was getting better at applying a finer line. I had to experiment a bit with thinning, but that too proved to be a useful exercise. (You experienced brush painters will find it no surprise that I discovered I wasn’t thinning the paint enough… 😉 )
Then Came The Weatherings
Next I started a process of chipping, using a sponge and Citadel’s Fenrisian Gray. I wanted to go a bit heavy, as I thought a heavily chipped appearance would seem to fit with the whole “grim dark” storyline of 40K. Much of this chipping obliterated the edge highlighting, but in areas that were not heavily chipped, I thought it blended nicely, and worked well together. After the Fenrisian Gray chipping, I went back and in selected areas applied more sponge chipping using Ammo of Mig’s Chipping acrylic color, to represent a primer layer, or the underlying metallic layer, or whatever fits the grim, dark ethos. (I just thought it looked cool.)
I’d deliberately waited to this point to add decals, as I wanted to see how all the chipping came together. The Citadel decals were flawless, going on over a gloss coat of Future and settling nicely with an application of Solvaset. Additional sponge chipping was applied to the decals with Macragge Blue, and then more Fenrisian Gray. I was happy with the result- it looks as if some less than sturdy paint was applied to the vehicle to denote their status as Colts fans (laugh!), but that paint did not hold up well in the heat of battle. (That’s what they get for going to GrimDark Mart for their paint. Always the low price. Always.)
For the plow blade, I base coated it in Citadel’s Leadbelcher, then applied various shades of rust colors in thinned, random fashion, using a Vallejo Rust and Chipping set. Some spots of Calgar Blue, topped with Macragge Blue, were added to simulate a few brave chips holding on the metal surface. (‘Cause they know no fear…) All was topped with a thinned wash of Nuln Oil. I thought it looked quite cool. Not perfect, but it was a great learning experience in being “rusty”.
The next focus was to muddy things up a bit. I started by applying Citadel’s Typhus Corrosion to various parts of the model. This is a wonderful paint in Citadel’s Technical line. It’s a grimy, brownish, oily, muddy color, but it has a bit of gritty texture. Not enough to make it like mud, but just enough to be a basis for dirt stains, or even rust. I applied a fairly thick coat to various sections, and then attacked it with a large water dampened brush to dilute and spread it. Multiple applications of this produced a very nice effect. I made sure to dirty up where the crew might climb on and off the vehicle, where the tracks might throw mud, and where the ramps would drop. Various pastels were added on the lower portions of the vehicle, and then spread about with enamel thinner.
The final step in the eathering was to airbrush a highly thinned mix of two parts Tamiya XF-69 NATO Black with one part Tamiya XF-9 Hull Red. This mix is my absolute favorite for airbrushing soot, exhaust, and other grimy effects. A final matt coat of Vallejo’s Mecha Color Matt Varnish was then applied.
While I have enjoyed each of the Citadel Warhammer 40K kits built, I think I had the most fun with this one, as I was able to apply the knowledge gained from the previous two with good effect. (Or at least I think to good effect… 🙂 ) It was truly enjoyable, from start to finish. And while I wouldn’t hold up the completed model as anything outstanding, I can say I found a great deal of personal satisfaction with the result. It’s rare that I complete a model, sit back and look at it, and think “that’ll do, pig. That’ll do.“
I’ve said it before, and while I know I’m sounding like a broken record- try one of these kits out. Watch a few videos on the Warhammer TV channel on Youtube to get a few pointers on the GW style, and then have at it. Do it in GW style, or another. Paint it canon color, or go your own way. It’s really modeling fun with no boundaries.


Leave a Reply